
Beef Wellington is on the menu in Book recipe, and we are going to teach you how to make this delicious recipe from scratch!
Follow along with the 📝 recipes below👇🏾👇🏾
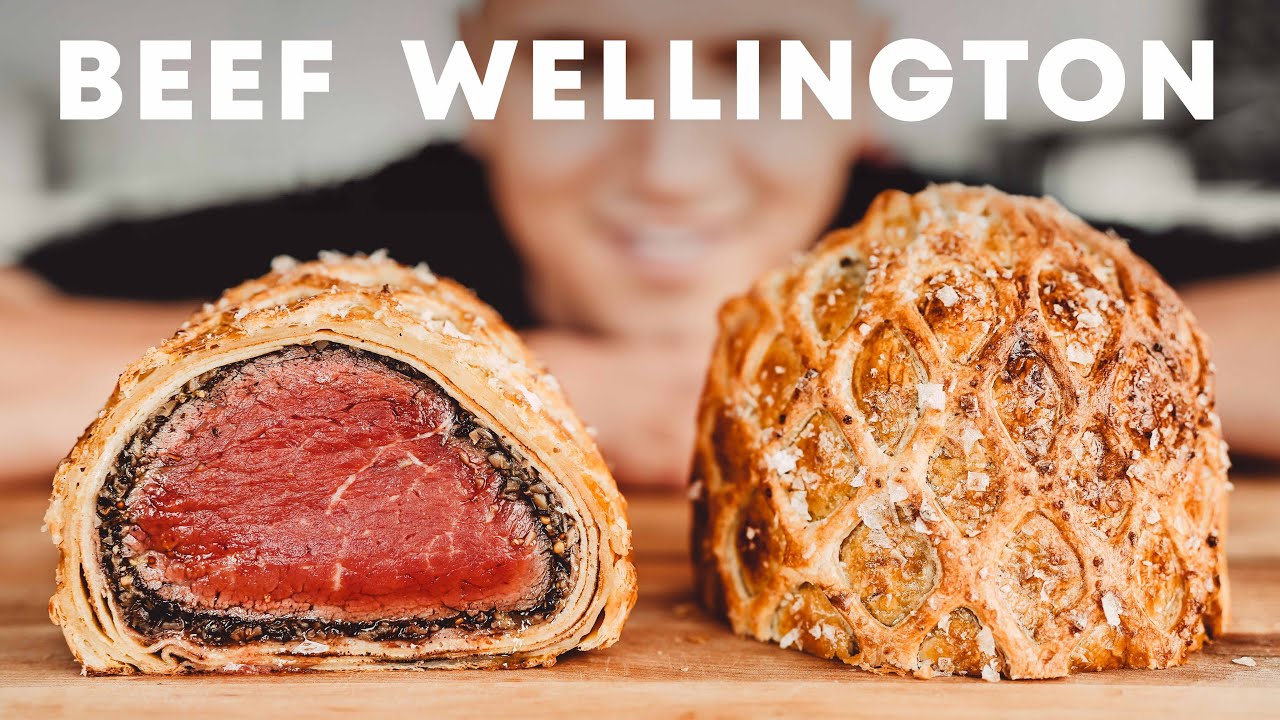
When you think of Beef Wellington, oftentimes the first name that comes to mind is Gordon Ramsay. But first, what the heck is it? You essentially sear the beef before wrapping it in layers of duxelles, prosciutto, and pastry. In essence, you sear a beef tenderloin (basically a long filet mignon) before wrapping it in layers of duxelles (minced mushroom blend), prosciutto, and pastry. This dish that originated in England is known by many to be one of the most daunting recipes for any home cook…but I’m going to show you that it’s not that bad after all.
This was cooked to an internal temperature of 129 Fahrenheit, which is on the higher end of the “rare” spectrum. You can cook yours longer or shorter, but NO. This is not raw.


The preparation steps are described in the video, you can also see the video transcribe for more detailsIngredients
Duxelles:
Crepe:
Mustard:
Chicken Stock:
Instructions

Because we’re going to bake it in the oven at the end to get that perfect golden wellington and we don’t want all that fat to melt, so for now that’s what we have, while we let the tenderloin come up to temperature, we’re going to start with what we call a dexcel, it’s spelled d-u-x-e-l-l-e-. It’s basically a fancy stuffing that we’re going to make with mushrooms, shallot and garlic. It’s actually pretty tasty and it’s not too hard to make, so don’t let the name scare you off. I’m going to pull out a little over a pound of assorted mushrooms, I asked my mushroom guy to go get some unique and fun things.We don’t bother, after we cut up all our mushrooms and make sure we’ve removed all the unwanted stems, we’re going to start chopping them up, you need to know this ahead of time, this part can get a little messy, because they need to be nice and small, I usually go for it. There are several methods to chop these mushrooms. because it’s going to take you a while, my favorite method is to put two knives between my fingers and go like this, up and down, all my mushrooms to chop them very fine, but I’ve seen other people do it like this, it’s a little bit messier and the mushrooms fly everywhere, but whatever. they’re going to be used to make this paste, almost like an olive tapenade that’s going to wrap around our Wellington, so they need to be nice and small. Once your mushrooms have been properly sliced, your kitchen counter will be a bit of a mess. but trust me your work will be worth it these are nice little pieces and now we’re ready to chop up those shallots and garlic for our shallots and garlic I like to do two medium sized shallots and then just two cloves of garlic for those of you who hate peeling those little bits on the outside of each clove of garlic I have a trick for you I have a trick for you take a jar or a cup, cover it and shake it up. Once you open it, most of the cloves are already peeled and it makes your life easier. Another trick to get the garlic smell off your hands is to rub your hands on a stainless steel object like the head of your sink. Now for the garlic, since I don’t like to cut on my cutting board and I’m also lazy, I’ll put the cloves in my garlic press and put them in a bowl. This will give us all the flavor of fresh garlic without having to mess up our cutting board and it will make our lives much easier. As for the shallots, just chop them the same way you would chop mushrooms. There is no particular method to follow, just make sure they are all the same size. Believe it or not, with shallots, I know this happened recently in a video with onions, but I’ve been chopping shallots long enough to not know.
If you hate peeling the little bits on the outside of each garlic clove, I have a tip for you: take a jar or cup, cover it and shake it, as if you were shaking it. Once you open it, some of the cloves should be completely peeled and it makes your life so much easier.
Once you’re done, it’s rubbing your hands on something stainless like the head of your sink, believe it or not, that’s the best way to get that garlic smell out. Now, for the garlic, since I don’t like to cut on my cutting board and I’m also lazy, I’ll just… put the cloves in my garlic press and put them directly into a bowl. This will give us all the flavor of fresh garlic without having to mess up our cutting board and it makes our lives so much easier. As for the shallots, just chop them the same way as the mushrooms. There is no need for a special method, just make sure they are all the same size. Believe it or not, with shallots, I know this happened recently in a video with onions, but I’ve been chopping shallots long enough to not be moved. I feel bad crying in front of you like this, so I’m sorry, but wellington is a good dish, I’m just a little emotional now that it’s all ready.
Let’s start cooking, first we’re going to put some olive oil in a medium sized pan, we’re not going to wait until it’s hot, I’m going to put in my garlic, then my shallots, and then a good pinch of salt, because you always get dirty when you put in garlic or onions. or onions. Now I’m going to turn the heat down to medium and coat them evenly so that they flame up. They should become nice and aromatic. Make sure you’re constantly scraping the sides of the pan so nothing browns and burns. our mushrooms, again, make sure you pick a pan that’s suitable for all of these mushrooms, it looks like I picked the perfect pan, you can add a little bit of thyme or other seasonings, and I always like to add a few fresh bay leaves, we’re going to pull them out at the end, and frankly. they’re a lot easier to pull out than the thyme, so I like them to add flavor without being too much of a pain. Now, over medium heat, we’re going to stir them a little bit for 5-7 minutes until they lose some of their moisture, like spinach. it will reduce in volume in a few minutes once it has reduced a bit, you can see that our pan is about half full now we are going to add a little drop of red wine because for me it gives flavor like nothing else and as you know red wine goes very well with beef ah it looks so good we don’t filming well no no now to finish these mushrooms let’s remove all these bay leaves then add just a little pepper for more seasoning and if you need just a little more salt your key here is going to be to have them as dry Once they are nice and dry, you can set them aside while the mushrooms sit on their side. The next step is going to be to make some pancakes. This is actually becoming a pretty common thing to do in a Wellington because you need something to help absorb the extra leakage, let’s say you didn’t cook those mushrooms long enough. of all-purpose flour, two tablespoons of granulated sugar and a small pinch of salt. Whisk it all together until it’s well mixed and make a nice little well in the middle of your bowl. Next, we’re going to break four eggs in the middle of that well. Some might tell you to do it one at a time. but I prefer to do it all at once, once the eggs are in, we’re going to whisk until it’s well mixed, keeping the eggs in the center of the well, then we’re going to slowly add 3 cups of whole milk, a little bit at a time. Oddly enough, I make my pancakes the same way I make homemade pasta, using the well method to mix it all together. Keep in mind that pancake batter is very thin, so don’t worry if it looks a little thinner than your good old pancake batter. Pancakes now to cook these pancakes in a large skillet we’re going to add a small piece of butter and let it melt now once it’s melted I’m going to go with about a third of a cup of my nice smooth pancake batter and then quickly swirl it around my skillet and try to get a nice even pancake then over medium heat I’m going to put about a third of a cup of my nice smooth pancake batter and swirl it around my skillet quickly to try to get a nice even pancake.
Then, over medium heat, we’ll let the first side cook for about two minutes. Once the pancake is cooked on one side, gently lift it up and flip it over. Don’t worry if it’s a little messed up, it’s actually pretty sturdy and you can put it back in the middle of your pan. Repeat this process until you have four or five pancakes, make sure you have enough to wrap the Wellington and again, this is not a necessary step but I think it’s really helpful. Technically, I don’t think it’s kosher to get that color on a pancake when you’re making it, but to me, there’s nothing like getting that nice soft golden brown. Oh my goodness, now for the last step before we work with that big filet, we’re going to make our own mustard, because with the beef wellington, you’re going to rub Dijon mustard on the beef itself. That’s one of the two things I made ahead of time in this video, but don’t worry, I’m not saying it’s homemade, it really is. I have yellow and brown mustard seeds that I combined last night with white vinegar, white wine, a little allspice, salt, white pepper, and onion, and it sat overnight in my fridge. on my wellington the homemade mustard is really tasty but again it wasn’t easy to make ahead of time so I made it ahead of time and now I’m just going to blend it so you can see how it turns out you’ll notice a lot of those big yellow and brown seeds are suddenly going to turn into this smoother dijon paste that you might see once I get to this point here I’m pretty happy because you can see a lot of yellow here and it’s ready to be spread I want a few more of these little mustard seeds in there just to get that texture but as far as I’m concerned we’re ready to go so let’s get this tenderloin out congratulations you made it to the beef the first thing we’re going to do without messing up this beef is slice it but because I know there’s going to be a lot of juice, I’m going to put a paper towel on it, you always have to be smart in the kitchen and it only takes a little bit of damage so you don’t mess it up next time, I’m going to rip the plastic off to expose this beautiful filet mignon and oh I like it I like that logo with the cow, it’s a really bad ass. Now it’s all about finding the perfect piece. I removed some of that fat, but mostly some of that silver skin that we really don’t want in our Wellington. easy to remove and it will help not to have those nasty little bits when eating. I realize I’m calling it a Wellington when it’s a filet, but you get my point, to make it look pretty. If I flip it over, you can see there’s kind of an odd portion here that’s not really attached to the main part, I’m going to cut it off because I actually need a nice uniform piece and to me it looks like it’s here with some nice clean cuts, I’m going to go through it with my sharp chef’s knife and now this is where you can probably tell that’s where a filet mignon would come from, that’s why the wellington is so incredibly good now like I said we want everything to be nice and even and I can see that about here it’s starting to taper which means I know there’s a little bit of silver skin here so I’m going to do my best to get that off a little bit because this is a luxury piece of meat. And more importantly, what we’re making is a luxury dish, so we don’t want people to have to fight that tough silver skin to try to eat a really sweet piece of Wellington. Isn’t it great that we cut this big piece into this beautiful, perfectly shaped piece, which we’re going to put in our Wellington as you can see on the sides here it’s a perfect piece of beef as I said if I cut it into two or maybe three pieces here it would be three servings of tenderloin but here we’re leaving the whole piece intact and we’re making this beautiful big Wellington that we can cut and open up so you can see it now it’s going to be cooked twice throughout this process first we’re going to seize it and before we do we want to season it with just a little bit of salt or I should say a lot of salt.
Before we do that, we want to season it with a little salt, or rather a lot of salt, making sure it’s all around, including the bottom, and hitting it with a nice little bit of fresh cracked pepper, which gives it even more flavor and is a key part of the seasoning throughout the cooking process.
Once you’ve seasoned it a bit, this beautiful piece of meat is ready to be seared.
First, we’re going to add a little bit of oil that has a high smoke point, that’s right, it’s time to sear that tenderloin. Once the smoke point is reached, we’re going to sear each side for about a minute and 30 seconds, depending on the size of your tenderloin, maybe a little bit more but not less. a little bit more but not less, we’re going to cook it later, so you don’t want to overcook it now, or your Wellington is completely ruined. Not really, but seriously, try to be careful with the searing. Right now, I’m going to place it in the pan, there’s going to be a lot of smoke.
Our goal is to get a nice crust and start cooking this thing lightly before we cook it all the way through in the oven. It’s such a beautiful piece of meat that the Wellington can be nice and rare when it comes out of the oven. I guess I should also say that if you like your meat medium rare, you can cook it a little bit longer, because you can’t really control the oven. on the puff pastry outside, you don’t have a lot of leeway to leave it in the oven longer or shorter, or your puff pastry won’t be browned. Once everything is done on the first side, we’re going to flip it over to the second side and let it sear more, but first take a look at the crust we already got here, also note on the edge of your fillet how much it’s already cooked, because you want it to be even on all areas. once the second side is cooked, another flip, again about a minute and 30 seconds on this last side here, then all we have to do is kiss these ends and this thing is ready to go There’s going to be a lot of smoke at this point and I already know I’m going to turn off the fire alarm in my building, but now kiss both ends of this Wellington, I would say only about 30 seconds on each side and once that’s done we’re going to take it off the fire immediately, uh. .. look, standing alone with your Wellington on a paper towel to catch any juices that might leak out, we’re going to cover it with our homemade Dijon mustard, I know most of you are probably going to buy the mustard and I’m not going to judge you for that, I promise, after all, if you dare to make a homemade beef Wellington, you’re already a pro and you’re not afraid of anything, but what I’m saying is, you need a good Dijon mustard.
You’ve already spent your money on that nice filet, you’ve bottled the other ingredients, so why skimp and use low quality mustard, it doesn’t make sense. When you coat that dish, make sure you paint it all over, just like with salt and pepper, you want to cover all sides of the Wellington to get that flavor. to get that flavor, when you’re cooking, you want to maximize that flavor. I’m going to flip this thing and get the last side of our Wellington. Usually you’re going to spot what’s going to be the bottom of your Wellington pretty quickly, and because that’s the part of my Wellington that seems to split the most, I’m going to use it as the bottom to keep it in the best shape possible. Once you’ve given it the full Dijon mustard treatment, you can assemble your Wellington. We’re finally ready to layer on this Wellington. these pancakes, I have a good big stack of them here, and since we have a big Wellington, I think I’ll use three to make sure everything is sealed. Our next step is going to be to layer the prosciutto. To be honest, I wonder about most foods, and I’ve never wondered I’ve never wondered why prosciutto goes in the Wellington, but I guess prosciutto is a great tasting meat and I’m not crazy about it being there, I just wonder why. You already know we’re going to continue with the mushrooms, you just have to spread them out in a thin layer. thin layer, but also enough so that you get all the flavor of the mushrooms, because I have to say that even though it sounds weird, it’s one of my favorite things about the Wellington. You may not like mushrooms, and I’ll be honest, I’m not the biggest fan myself, but this tastes amazing, and now the… The moment you’ve all been waiting for is the moment of the Wellington. Hold that thing as tight as you can when you get under the pancakes and start rolling, make sure you hold it as tight as you can. tucked in. Now I’ll come in with my ridiculously large plastic wrap, whatever you call it, and this is when we tuck our Wellington into a nice little sausage, rolling it again and keeping it as tight as possible. In the process, I’ll do the same thing again. with my plastic wrap to roll the Wellington, but mostly to get nice sausage tails, so I can tighten the edges and make it really nice and tight. This is the step where our Wellington is going to sleep for a little while. step right before we cook it, where we want to give it a chance to firm up a little bit and get that nice oval shape that we want when we cut it. Now that it’s all wrapped up, we’re going to put it in the fridge for about 45 minutes, until it’s nice and firm. with our Wellington, this is a very important part for me, because yes, your Wellington will be juicy, but you want a nice sauce, who wouldn’t? First, I’ll put a little bit of butter in, let it melt, maybe even brown it a little bit, for more flavor, then add some thyme. then I add a little bit of thyme, it’ll crackle a lot but I like to put it in first so the butter takes all the flavor out. Once it’s cooked, I’m going to add shallots, which give such a good flavor to a broth like this, I want to stir them in. saute them a little bit, not necessarily to brown them, but to bring out their flavor, and once it’s nice and hot, we add a little bit of red wine, and once it’s windy, we flame. Now I’m going to add my homemade bone broth. for about three months in my freezer. Onion skins, extra onion pieces and all the onion skins, carrots, celery, anything that goes bad, red peppers, etc…. Look at this mess. I let this broth sit for nine hours overnight and it’s very stirred up, which means there’s which means there’s a ton of collagen from all the bones. First of all, it’s going to be pretty satisfying.
I’m going to peel it right out of my bowl, sorry, sorry, I’m getting ahead of myself, but seriously, how cool is this stirring? I’m going to put all of this in my pan and it’s going to melt quickly to make our broth. to make our broth and while it’s melting, I want to show you my proof, like I said, the celery, the carrots, the onions, the parmesan crust, the chicken bones, the beef bones. We have everything in this thing and that’s what it comes down to. Once it melts, we want to cook it to get all the flavor out of it, and we put it all back together, and then we strain it before reducing it even more to get a thin, thick sauce for our Wellington. We pour it all into a bowl and strain it through a sieve because we don’t want those solid chunks.
We throw it all away and put it back in the pan to reduce until we get a thick paste. Now for the puff pastry, the last step before putting the Wellington in the oven. I guess I lied, we don’t do everything at home today, but honestly, the puff pastry is one of those things that no one does at home except the person making it. It’s one of those things that if you make it homemade, it’s not going to be any better than this one, and I honestly don’t think I’m saying that because we’re not making this homemade part. We’re just going to roll this sheet of puff pastry out a little bit. of the thickness of the wrapper, and you also want to cut it a little bit across so that it fits all the way around the Wellington. Once that’s done, flip it over to make sure it’s disconnected from the cutting board, and then take the Wellington out of the fridge. Once we get the wreath out of the fridge, we’ll want to quickly and carefully unwrap it from its plastic wrap. I have to say that plastic wrap is not one of the things I like to use in the kitchen, although it is necessary for many recipes. on the base of our puff pastry, perfectly centered, then let’s paint a little egg white, which is a couple of egg yolks with a little water, right under the puff pastry to make sure everything sticks together. I like to paint the whole inside of this thing, that way it’s much better to cover everything than to have the worst case scenario where something doesn’t stick and gets ruined when you roll it out once we get it all painted let’s roll it out keeping everything as tight as possible then once we get to the last part let’s take our knife and make a nice clean cut clean across now we just want to pinch everything together and make sure it’s really solidified here at this point it’s going to be the bottom of our wellington but we still want everything to be secure and the same thing goes for the corners here which will pinch and roll up a little bit like a dumpling if you will, you can even take a little square at the ends and do it like this, it looks pretty cute now I’m going to do the same pinching process on the other side of my Wellington and maybe put the same little cap on the end here so it looks nice and even and then we can place it on our baking sheet here I just want to quickly lift it up and put it down quickly so nothing breaks off again we want to work quickly here now at this point to get that nice golden shine we want to paint the whole Wellington with Egg wash again, that’s going to give it that nice golden brown color that we’re all looking for so you really want to make sure that you paint every part of it if possible, that’s where you get that real beauty on your wellington and I know I’ve mentioned this before but I happen to really love I love painting this kind of stuff, I don’t know what it is, but for someone who’s cooking all the time, it’s nice to get out a paintbrush and just start using it instead of your hands or a spoon. If you have an extra sheet of puff pastry and you weirdly have one of those lattice rollers. that I only have to make a dessert I made a while back, you can put a really pretty pattern on the top of your Wellington.
We’re going to start just above the edge of the dough and while holding the back, go all the way down my sheet here, then with my knife I’m going to cut all the way down this puff pastry gently. Both sides here, which will leave me with a nice lattice pattern that I can place on top of my Wellington I’m going to bring the tray back into the frame here and now, once we space it out and we have this perfect lattice pattern, we’re going to lay it perfectly on top of our Wellington by pressing it lightly and tucking it around to make sure we have the perfect pattern all the way around once it’s completely tucked in we’re going to take a little knife and cut it all off to make sure it fits well again this is definitely not a necessary step but we’ve gone so far that why not make it perfect once we have our completely tucked in we will once again brush it with a little more eggnog to make sure everything is pressed and set and also to make sure the lattice gets a golden color and there is only one thing left to do before we go in the oven.
Can you guess what that is? I’ll give you a little second while I paint it to think about it, if you haven’t already guessed it, think about the seasoning, that’s it, just a tiny bit of salt on the top of the Wellington, maybe on the sides as well, just to make sure that everything is covered with one last little bit of salt, and then we bake it. I can’t tell you how excited I am to say those words, “Wow, we’re taking sheet salt to the next level with this thing.” I can’t tell you how excited I am to say those words “wow, we’re taking sheet salt to a whole new level with this thing”. I’m going to put this in a 415 degree fahrenheit oven and honestly I can’t really give you an exact time, you’ve been working on this the whole time. After about eight minutes, start watching carefully to get it out when it’s nicely browned. I’ll see you in a few minutes.
It’s true, we made the most beautiful beef Wellington beer, but as they say, it’s what’s on the inside that counts. It may look beautiful on the outside, but if the meat inside isn’t cooked to perfection, I won’t be happy, Gordon won’t be happy, no one will be happy, so let’s dive in, I’m under too much pressure, I need a sharp knife, I can’t miss this, and now, oh my God, we’ve all been waiting for this moment, I know, I know, so let’s do it, let’s go through that beautiful crust, let’s look at that golden perfection, let’s go through that delicious hot beef tenderloin and like I said, we’re looking for a nice rare, let’s open it up, oh my god, it looks good, it looks good, come on guys, listen to me, sometimes in front of the camera, things can look weird, and from what I can tell, it looks perfect, but I’m just going to say that the way you test if you’re making a Wellington and you want to know if it’s perfect, is just by touching the middle of the beef, if it’s nice and hot like it is here, then you’ve got it cooked to perfection. I am absolutely and completely blown away by the cooking of this beef Wellington and now it’s time to eat it for the final hurrah. To finish this Wellington, I’m going to take a small slice and today I’m going to sit back and enjoy the food. I usually go for it, I just take a few bites while I eat, but today we’re going to sit down and talk about it all. To start, I’m going to take a nice thick slice of our Wellington, it’s not always easy to cut, but as you can see, I have a really good slice for the rest of our Wellington.
I’ll eat it all later. Today, let’s give her a nice little plate. I’m going to start by going under the Wellington and placing it nicely on our plate. For me, the black plate makes it easy to see the food.
Finally, let’s take some of that reduced bone stock that is now a delicious thick, sticky glaze. And let’s add some of that to the base of our Wellington. here, barely touching the edge and just enough to have enough sauce to enjoy it. Now finally, just to liven things up a bit, I like to sprinkle my Wellington with a few sprigs of freshly chopped chives and that’s it. This is the whole dish here, this is what we worked for. Yes, I think you’re wondering why we have this little plate on the edge and you may have already guessed it. it’s for the pesto if you don’t know who that is, that’s my little hamster and I’m going to give him a very small piece of the wellington put right there, there’s just a little bit of gravy right underneath, and then I’m going to top it with a very small piece of chives because he’s not supposed to eat a lot of onions because it’s a little bit spicy for him, and then just a couple of drops of this beautiful chicken glaze that he’s going to absolutely love. now it’s time to sit back and enjoy now pesto is a very lucky hamster and he’s already crawling all over my hands because he knows there’s something special in front of him I’ve said this before but it was on sale so instead of twelve dollars it was actually only nine dollars and he’s still eating food that’s way more expensive than he is but I love him so much and those numbers don’t really matter to me
Now I’m going to put Pesto down and let him enjoy the situation next to me so we can have a nice family meal together. Pesto, try it and see what you think buddy, I’m really curious to see what you think, how it is, you’re right, it’s absolutely spectacular, not only is it beautiful, but it’s so good, you’re already fresh, man, come on, slow down a little bit, enjoy it. There’s something special about this beef Wellington, it’s the most tender beef out there. the most tender beef there is and I don’t even need the chef’s knife in fact it’s probably dangerous to have it near Pesto I can very easily use my little fork here just to cut this meal it’s so tender and when I take a bite it’s like biting into a soft creamy pillow now it looks like Pesto is done with his meal here but I’ve still got a ways to go so I’m hoping he’s going to wait while I finish let’s go- here after your plate is my plate after a plate I think it’s time to put him back in his cage, but he’s proven to like the Wellington. Thanks for being there buddy. I’m serious when I say there’s something very special about the Wellington. It starts with that incredibly tender and soft fillet inside, that’s why they call it fillet after all. a little hint of that red wine that’s in there and it’s so good it’s so sweet after that of course you’re immediately hit with that delicious buttery crispy puff pastry think about biting into a croissant and then a piece of tenderloin and that’s what you get with the wellington but that doesn’t even begin to describe all the flavors in here of course we’ve got the salt and the pepper but it’s so much more than just that sauce it’s what really brings it all together Keep your bones, save your leftover vegetables, save your parmesan rinds, I’m telling you, and every once in a while, put it all in a big pot. Cover it with water, add a few bay leaves and a good pinch of salt, and let it cook. The more you reduce the sauce, the tastier it is, and I’ll tell you right now, any broth in the market tastes the same. because they can see through the windows and it must be terrible for them. Now I’m going to take one last little bite. But I really want to say that this video was a pleasure to make, I really hope you all like it, because a beef Wellington is not the easiest thing ever. What I’m trying to show you is that you can do it, seriously, if you watched this video, you know how to make a Beef Wellington, and again, you don’t have to do it all from scratch. The worst that can happen is you take it out of the oven and maybe it’s undercooked, you put it back in and put it back in the oven for a few more minutes.
That’s fine, there are ways to get around all the usability errors that can occur by doing something like that, but I’m telling you, you can do it now. Thanks for watching the video, it was really fun. I was on the phone not too long ago trying to get a 75 pound wheel of parmesan cheese, wait till we get it through the door. This wellington is still hot and I know I have a high tolerance for heat, but I can’t hold it with my bare hands yet, but I just wanted to say thanks for watching, happy cooking and see you next time.
Bon Appétit